こちらフィンランドは、だんだんと秋らしくなってきました。
月曜日の仕事後、天気が良かったのでちょっと森へ散策へ、いつもの様に犬3頭同行です。
On Monday after the work, the weather was really good, so went for walk in forest.
Thursday, September 8, 2011

Friday, September 2, 2011
4つのプロジェクト、1つ目は完成。
プロジェクト4つ同時進行してます。
1つ目は完成、木のスプーン3本。

材はネズの木。
大きい方から、
なべ掻き混ぜ用
味見用
ジャムなどのビン用
プロジェクト2つ目と3っつ目は、だらだらと削り続けてるウォーキングスティックと丸木弓。
 ウォーキングスティックの方はほぼ形になってきたのだが、なんとなく重いため、もう一回り細くするために削り中。削り終わったら、石突きを付けて完成。材はナナカマドです。
そして丸木弓の方は二本目の挑戦になる物。一本目、プカラでのキャンプ中に作り始めた物は見事に折れてしまったので、材を変えて再挑戦。今回はネズの木を使っています。大まかな形は削り出せたので、これから反り方の調整に入るところ。ここからが勝負。
4っつ目のプロジェクトはこれ↓↓ベルトキット。
 左側から、
>カメラケース(ゴリラポッド収納用のウェッビング付き)。
>Maxpeditionローリーポーリー・ダンプポーチ小(水筒や、軍手を突っ込んでおくのに便利)。
>ティンダーポーチ(以前紹介した物です)。
>ナイフ。
後はポッシブルポーチとエマージェンシーパックを追加すれば完成!??
欲を出してミニクックセットとフードパックも追加しようかな??などと考えてもいるのだけど。あまり追加すると重くなって邪魔だろうな・・・
これが終わってもまだまだ続くプロジェクトの山・・・次に計画しているのは鍛冶物2本、そして昨日の更新で書いたカヌープロジェクト。
カヌーの方はまだまだ計画初期段階、現在設計図と材料の入手先検索中。出来るのかどうかも自信なし、でも挑戦したいものの一つ。期待せずに待っていてください。
1つ目は完成、木のスプーン3本。

材はネズの木。
大きい方から、
なべ掻き混ぜ用
味見用
ジャムなどのビン用
プロジェクト2つ目と3っつ目は、だらだらと削り続けてるウォーキングスティックと丸木弓。

そして丸木弓の方は二本目の挑戦になる物。一本目、プカラでのキャンプ中に作り始めた物は見事に折れてしまったので、材を変えて再挑戦。今回はネズの木を使っています。大まかな形は削り出せたので、これから反り方の調整に入るところ。ここからが勝負。
4っつ目のプロジェクトはこれ↓↓ベルトキット。

>カメラケース(ゴリラポッド収納用のウェッビング付き)。
>Maxpeditionローリーポーリー・ダンプポーチ小(水筒や、軍手を突っ込んでおくのに便利)。
>ティンダーポーチ(以前紹介した物です)。
>ナイフ。
後はポッシブルポーチとエマージェンシーパックを追加すれば完成!??
欲を出してミニクックセットとフードパックも追加しようかな??などと考えてもいるのだけど。あまり追加すると重くなって邪魔だろうな・・・
これが終わってもまだまだ続くプロジェクトの山・・・次に計画しているのは鍛冶物2本、そして昨日の更新で書いたカヌープロジェクト。
カヌーの方はまだまだ計画初期段階、現在設計図と材料の入手先検索中。出来るのかどうかも自信なし、でも挑戦したいものの一つ。期待せずに待っていてください。
Thursday, September 1, 2011
My mind is filled with...
Since the last weekend, my mind is filled with the idea getting my own canoe.
Every time thing like “I want it” comes strong in to my mind, the first step is to seek possibility of making one myself.
This is one of my good (perhaps bad??) habits that before considering buying the ready made one, I start looking for a way to make. Then if that seems to be way too difficult, then start considering of purchasing.
So that what I have started now, browsing through the internet, hours and hours, collecting information on how to build canoe all by myself.
As the research goes, there are several ways to make canoe based on the material used.
1: using plastic or glass fiver to mold the canoe.
>This is what most of nowadays canoes are made. But, it is not realistic method for self-builder. It involves too much initial investment, finding materials in small lot.
2: Wood or Wood & Canvas canoe.
> Very common for high-end / premier canoes and are beautiful. Also this is realistic method for self-builder. But still I am not sure, how much the materials would cost and not sure if I can locate them within or available to Finish market. Also skill required might be too high for me.
3: Birch bark canoe.
> This is most “Bushcraft” like way of making canoe and requires only crooked knife and awl. Material cost is low as well and the skill required seems to be within the reach of mine. But the issue here is the birch bark. It is impossible for me to fined the birch bark, which is suited for canoe making. At least for now, and in near future.
4: Plywood canoe.
> This probably the easiest way to self-build a canoe. It basically cut out the plywood based on template and glue them all together. End result seems to be quite nice, but the issue is,,, I DO NOT LIKE IT!!! I want something more traditional!
5: Skin on frame boat canoe.
> This is very simple, make frame and put the ballistic canvas on top to make the hull. Cheap and easer to make. It also look quite traditional, but I am not quite convinced with it.
Based on this, I decided to look for the ready made ones… but… that is totally out of reach. Even the used ones are starting from 500e and those are kind of crappy looking. I rather then pay for new inflatable canoe with that money…
Then suddenly came to my mind, What if I replace the birch bark to canvas??? Can it be done??
The beauty of birch bark canoe is that the constriction starts from outer hull, when other canoes are made other way around. This makes the low initial cost and tools required possible. You do not even need to make the mold nor strong-back (the total canoe shaped template).
So went back to look for if someone has done it…
Yes, I found it and it was done by Innu people and is beautiful. They have replaced the birch bark to PVC treated canvas. Also, instead of using cedar, they are using spruce and fir. Those are quite easy to find in here in Finland, and I even might have posibility of getting the logs.
Mmmm… I can start to see the near future projec…
If you are interested in, click the link below to check out the page. It is very interesting and lots of information about Innu people.
http://www.nametauinnu.ca/en/culture/tool/detail/27
Tuesday, August 30, 2011
カヌー - Canoeing
初めてカヌーに挑戦。ライフジャケット着て乗り込んで、基本テクニックをいくつか教えてもらって即ショート・トリップに出発。体で習え!という事らしい。漕ぎ始めは真っ直ぐに進まなかったのだけど、すぐにコツがつかめて、スイスイと真っ直ぐ進むようになる。
楽しい、これはやばい、思いっきりはまってしまった。普通の手漕ぎボートと違って軽いから気持ちよく進む。ゆったりとリラックスして漕げるから回りの景色を楽しむ余裕もある。はっきりいって気持ち良い。
湖の上をすべるように進み、いくつかの島を巡って出発地点へ戻る簡単なコースだったのだけど、カヌーの魅力にすっかり取り込まれてしまいました。こんなので湖から湖を渡り歩いたら楽しいだろうなぁ・・・
I have had my first canoe experience last weekends. Put on a lifejacket, get in to canoe, very brief and basic paddling technique introduction and off to short trip. It was only difficult at beginning to go straight forward, but got hang of it soon.
This is fantastic! That all I can say. It is totally different feeling than usual lowing boat. So relaxing and can pay attention to surroundings.
I am totally hooked to this canoeing. This time was only short trip around few islands on lake, but would be so much fun to take long canoe trip going lake to lake.
Thursday, August 25, 2011
JPBKβ2をちょっと変更 – Little modification to JPBK beta II
JPBKβ2へ少し手を加えてみました。今までパラコードだった緒をやめて、革のベルトループ式に変更。
I have made small modification to the JPBK beta II. The modification is to the sheath, replacing the 550code to leather belt loop.

理由は
1>パラコードでは細くて安定が悪い。真田紐などなら良いが、手に入らない。
2>ベルトキット構成用の良いベルトを手に入れたので、ぜひ活用したい。
という2つの理由から。
The reasons of making this modification are:
1> 550 code as belt is too thin and unstable. Something wider code would to better, but cant find one I like to use.
2> I have got a nice belt which planning to be a outdoor belt kit. So really wanted to utilize my new belt.
で、完成したのがこれ。
And so, this is what came up.
↓↓↓↓
この新シース、早速腰に下げて試してみたがなかなか調子が良い。ちょっとColtSAAを下げているような気分になる。試しにバックパックも背負ってみたが、バックパックのウエスト・ストラップにも干渉しない。早くベルトキット完成させて、秋の森歩きに行きたくなってきた。
I have tried this new sheath with the belt, and I really like it. It bit feels like hanging Colt SAA or something. Tried the backpack on as well. And it does not get on the way of hip belt of the backup. Can’t wait to complete this belt kit and get out to autumn forest.
I have made small modification to the JPBK beta II. The modification is to the sheath, replacing the 550code to leather belt loop.
↓↓↓変更前のJPBKβ2- JPBK beta II befor modification. ↓↓↓

理由は
1>パラコードでは細くて安定が悪い。真田紐などなら良いが、手に入らない。
2>ベルトキット構成用の良いベルトを手に入れたので、ぜひ活用したい。
という2つの理由から。
The reasons of making this modification are:
1> 550 code as belt is too thin and unstable. Something wider code would to better, but cant find one I like to use.
2> I have got a nice belt which planning to be a outdoor belt kit. So really wanted to utilize my new belt.
で、完成したのがこれ。
And so, this is what came up.
↓↓↓↓
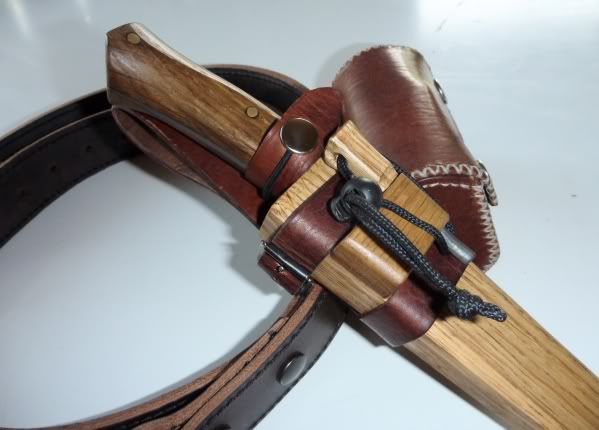
意外と苦労したのは、固定用の小さなベルトバックルの位置。ファイヤースチールが正面に付く鞘なので、バックルは側面に付けるしかないのだが、その位置決めが微妙。ちょっと前すぎても後ろすぎても突起してしまう。見た目もある程度気にしないといけないから更に難しい。
ナイフ固定用のループへはクリス・グラント(Chris Grant = Silver Fox Bushcraft Knifeの作者)のアイディアを拝借。ゴム紐をスナップボタンの間に渡し、スナップを外すと同時にループが開く仕組み。これでナイフの抜き差しで切ってしまうのを防げる。
It was surprisingly difficult to set the small belt buckle to good position. Tiny bit foreword or backward will make the buckle sticks out.
For the loop, which secures the knife to the sheath, I took the idea from one of Chris Grant’s knife. It has elastic code between snap buttons. So when the button is released, it opens up itself and does not get on the way of blade.
この新シース、早速腰に下げて試してみたがなかなか調子が良い。ちょっとColtSAAを下げているような気分になる。試しにバックパックも背負ってみたが、バックパックのウエスト・ストラップにも干渉しない。早くベルトキット完成させて、秋の森歩きに行きたくなってきた。
I have tried this new sheath with the belt, and I really like it. It bit feels like hanging Colt SAA or something. Tried the backpack on as well. And it does not get on the way of hip belt of the backup. Can’t wait to complete this belt kit and get out to autumn forest.
Tuesday, August 23, 2011
Emännän veitsi – 奥方のナイフ
夏休みのまとめ記事もこれで最後になります。そして、最後の記事はやはり鍛冶物。妻の誕生日が近いのでEmännän veitsi – 奥方のナイフを作ります。
Emännän veitsi = Naisen veitsi とか Akkain veitsiとも呼ばれ、女性、とくに台所を仕切る女性用のナイフになります。
(ちなみにフィンランド語でナイフはpuukko,包丁はveitsi(ヴェイチ)と呼びます。そしてEmännän(エマンナン)は『奥方の』の意味。)
通常このEmännän veitsiは、小型、薄めの刃で、柄はタングを曲げてそのまま柄にします。そこで、こんな感じのものをデザイしてみました。

今回は、ビッルネスの骨董屋で見つけた延ばしタガネが在りますので、これを使ってガンガンとタングを延ばせるはずです。
まずは素材の下ごしらえ。古ヤスリの目をグラインダーでガンガン落とします。

材料が揃った所で、火床を改良。ロストルを3本に減らし、空気の吹き込み口を耐火煉瓦で半分塞ぎます。これで炭の消費を減らし、奥の方にあまり温度の上がらない場所を作る事が出来るはずです。
火床が整ったら、火を入れ古ヤスリを過熱し素延べに入ります。

刃になる部分をほぼ予定の長さ、厚さ、幅に延ばし、先を斜めに切り落とし。

切り落としたらベベルを打ち出して切っ先を少し上げ、刃幅と形を決めます。
ここまで来たら後は簡単、ひたすら柄になる部分を叩き延ばすのみ。延ばし用の槌と延ばしタガネを使っていますのであっという間に延びます。が、ここで問題発生。刃側を掴んで柄の部分を再加熱し火床から取りだすと・・・
炭を掻いて見るとありました。どうやら持ち上げた時に自重で折れたようですが、何で???

熔解した様子は全く無いので、無理に延ばしすぎたのでしょうか?今までに無い失敗なので全く原因不明。
仕方が無いので軟鉄の棒を鍛接し、延ばすために再加熱・・・ また折れた。何で?なんで???誰か教えて!!!
作りなおす時間は無いので予定変更。残った部分を薄く幅広に延ばし直してナカゴにします。


柄材はセイヨウネズ
真鍮ピン2本
グラインドはコンベックス(どうせ研ぐのは俺だからこれでOK!)
料理以外にも使えるように刃は果物ナイフと通常のナイフの中間くらい。シースも、ベルトループとかどうせいらないだろうから無し。
後はリューターで名前彫って、今夜妻にプレゼントします。
Emännän veitsi = Naisen veitsi とか Akkain veitsiとも呼ばれ、女性、とくに台所を仕切る女性用のナイフになります。
(ちなみにフィンランド語でナイフはpuukko,包丁はveitsi(ヴェイチ)と呼びます。そしてEmännän(エマンナン)は『奥方の』の意味。)
通常このEmännän veitsiは、小型、薄めの刃で、柄はタングを曲げてそのまま柄にします。そこで、こんな感じのものをデザイしてみました。

今回は、ビッルネスの骨董屋で見つけた延ばしタガネが在りますので、これを使ってガンガンとタングを延ばせるはずです。
まずは素材の下ごしらえ。古ヤスリの目をグラインダーでガンガン落とします。

材料が揃った所で、火床を改良。ロストルを3本に減らし、空気の吹き込み口を耐火煉瓦で半分塞ぎます。これで炭の消費を減らし、奥の方にあまり温度の上がらない場所を作る事が出来るはずです。
火床が整ったら、火を入れ古ヤスリを過熱し素延べに入ります。

刃になる部分をほぼ予定の長さ、厚さ、幅に延ばし、先を斜めに切り落とし。

切り落としたらベベルを打ち出して切っ先を少し上げ、刃幅と形を決めます。
ここまで来たら後は簡単、ひたすら柄になる部分を叩き延ばすのみ。延ばし用の槌と延ばしタガネを使っていますのであっという間に延びます。が、ここで問題発生。刃側を掴んで柄の部分を再加熱し火床から取りだすと・・・
柄が無い!!??
炭を掻いて見るとありました。どうやら持ち上げた時に自重で折れたようですが、何で???

熔解した様子は全く無いので、無理に延ばしすぎたのでしょうか?今までに無い失敗なので全く原因不明。
仕方が無いので軟鉄の棒を鍛接し、延ばすために再加熱・・・ また折れた。何で?なんで???誰か教えて!!!
作りなおす時間は無いので予定変更。残った部分を薄く幅広に延ばし直してナカゴにします。
で、出来たのがこれ↓↓↓↓


柄材はセイヨウネズ
真鍮ピン2本
グラインドはコンベックス(どうせ研ぐのは俺だからこれでOK!)
料理以外にも使えるように刃は果物ナイフと通常のナイフの中間くらい。シースも、ベルトループとかどうせいらないだろうから無し。
後はリューターで名前彫って、今夜妻にプレゼントします。
Monday, August 22, 2011
フィスカルス - Fiskars 2
フィスカルスショップには、フィスカルスの歴史、製品などの展示がしてあります。
There is a Fiskars’ history and products exhibition at Fiskars shop.
There is a Fiskars’ history and products exhibition at Fiskars shop.


フィスカルスのナイフのコレクションも見所なのですが、最も興味深かったのは溶鉱炉と鍛冶場の模型。
It is very impressible display of Fiskars knives here, but the most interesting display was miniature model of blast furnace and smith shop.


溶鉱炉の大きさもすごいのですが、水車を使った原始的な動力ハンマーや、鞴は感心する仕組みです。
the size of the blast furnace is impressive, but what impressed me most was the gimmicks of powering the bellows and power hammer. It is powered by water mills and was very interesting to see how the power was transferred to hammers and bellows.
フィスカルスを満喫した後はキャンプ場へ戻り食事、ゆっくりしたと夕方をすごしました。1晩目の夜中、使用していたテントの対雨量を超える強い雨に見舞われ微妙に雨漏りしたので、この夜はキャンバスポンチョで補強です。そしてやはりこの夜も強い土砂降り。しかしキャンバスのポンチョタープは見事に持ってくれました。ずぶ濡れのように見えますが、裏側は軽く湿っている程度。化繊テントのカバーしきれてなかった部分は、内側に水が滴ってました。
After the visit to Fiskars, back to camp. Spend some relaxing evening. But since, night before, we have had quite bad raining at nighttime. And the tent we have did not hold the rain well. it started leak a bit. So, need to reinforce with the canvas poncho tarp on top of tent. As expected, we have had downpour again this night, but the tarp held the rain very well. Actually, it held the rain much better than modern tent fabric.

最終日はビッルネスへ。
ここはフィスカルスのように観光地化されてないのであまり見るところはありませんが、それでも昔の工場などは残っています。
The last day, we stopped by at Billnäs on the way back home. We weren’t expencting much from this place since it is not sight-seeing:nized .


観光地化されいないにしても殆ど廃墟状態。もう少し期待していたのだけど・・・
But, it is more like ruin. Really not much to see. Just few shops and restaurants.
ビッルネスは残念でしたが、非常に楽しい旅行でした。鍛冶趣味の視点での記事でしたので、その関連の物しか紹介しませんでしたが、タンミサーリ、フィスカルス、ビッルネスには多くのハンドクラフトのお店があります。わたしが、鍛冶物をあさってる間、妻は陶器や、アクセサリー関連の物を。また、フィスカルスには多くの木工所が在り北欧デザインの木工家具なども見れます。時期になると、クリスマスマーケットも出来るようなので、ぜひまた訪れたい場所ですね。
It was disappointing at Billnäs, but the trip was really enjoyable. Other than the blades and metal and blacksmith things, there are many different handcraft shops and workshops around this area. I did not write about it but handcrafted wooden furniture and its workshops are also very interesting attraction. I hear that Fiskars Christmas markets are also nice to visit, perhaps will visit that this winter.
Subscribe to:
Posts (Atom)